Yesterday was Lou’s birthday. Lou is Amber’s dad and we miss him quite a bit. He died a few years ago during a period of time when Amber was having a hard time reconciling her feelings about him. It has been rough at times. We have celebrated his birthday each year since in a special and somewhat unusual way.
Amber has memories of Lou waking up and cooking food in the middle of the night. One of his favorites had been fried ravioli. So each year on his birthday we celebrate with Midnight Ravioli. It isn’t a complicated recipe. Just heat up a bit of oil in a frying pan, throw in some cheese ravioli (I think fresh works best), flipping once and cooking until the ravioli are warmed through. They get browned, slightly crisp and a little puffy. The cheese gets warm and melted and they are absolutely delicious. We finish them off by dipping in some red sauce.
I’m glad we’ve chosen to remember his birth and not his death as some family members have. It is nice to have a simple yet meaningful ritual that helps us keep him in our hearts Soon we’ll be able to involve Wesley and Jillian in a happy event and teach them a bit about their grandpa. Happy birthday Lou! We won’t forget you so long as we have midnight ravioli.

By now you probably know that I am planning on running the Austin Marathon. It is being held in downtown Austin on February 17th, 2008. You probably also know that I’m not much of a runner. Sure, I can run. I even do run on a fairly regular basis. What I am not is a very good runner. I’m kind of fast (not very) over short distances, but really, really slow over long distances. Plus the farthest I have ever run is just over 7 miles quite a bit short of the 26 miles and 385 yards that defines a marathon. Oh, and that seven mile run? I got hurt and couldn’t run for several months after.
At this point you should be thinking something along the line of “What the heck is he doing running then?” or is “Is he stupid”. I’d answer “I don’t know” and “Maybe” respectively. But really I’ve wanted to run a marathon for some time. Then Mat, a friend at work, said he was going to run and asked if I would be interested. Sure, why not? The marathon was more than six months away and I knew I needed about 5 months or so for training. It sounded like fun and I guess I just needed a little push to do what I had already wanted to do. And as an added bonus it would give me an excuse to play with some gadgets and keep track of a lot of data. Yes, I am a nerd. No I’m not embarrassed by it. So expect to see graphs, charts, maps, and spreadsheets during this whole process.
My real goals here are fairly simple, but not at all easy to achieve:
- To complete the 2008 Austin Marathon
- Under 4 hours is my hope
- To enter the marathon uninjured and well prepared
- Increase my overall fitness
To meet the three goals above I have been working on a plan in each of the following areas. Expect more on each area later.
- Follow a training plan closely
- Stretch daily
- Eat right
- Run purposefully
- Improve focus and resolve
I will be creating a page (see the top of the website) with links to the data and nerdy stuff I mentioned earlier, plus more running info. Trust me, lots of data in the works!
Tags: ATT Austin Marathon, Austin, Marathon, Running
 Rarely do I get excited by any products designed for kids or for their parents. Usually they are cheap, poorly made, really badly implemented or just plain a waste of money. I can’t count the number of things we thought we needed before Wesley was born that we can live without. Or things that seem like a good idea, but just don’t pan out. The ear thermometer fits into that last category. It seems like a great idea. A thermometer that registers almost instantly. What they don’t tell you is that it hurts like crazy when you use it properly and even if you do jam it in there far enough you’ll get different results every time you use it. So basically its painful, expensive and a waste of time.
Now Amber and I have been looking at this Frog Pod thing by Boon, Inc for a while. It is cute, but not cutesie and we both like it. Basically it is a plastic frog that hangs on your bathroom wall. It holds your kids’ bath toys. Lots of painful plastic toys in the bottom of a tub is a problem all of the time. But when you work really early in the morning like I do it is worse. Wesley and I share a tub so that I don’t wake Amber and Jillian in the morning. I’ve spent the last couple of months at the new house and the last couple of years at the old houses stepping on and kicking out of my a ton of toys that “float or sink”. The Frog Pod is just a beautifully designed, well executed, relatively affordable and practical piece of equipment.
It sticks to your wall in one of three ways. Using either the included suction cups, the included double sided tape, or optional screw mount. The frog is made of three pieces. A mount for the wall, a frog body that slides onto the wall mount and a basket that you use to scoop up the toys. and forms the frog’s back. The mounting is easy and they even include an alcohol wipe to clean the area first. I started with the suction cups assuming that it would fall off, but wanting to give it a shot before using the tape which would have been a ton of work to remove. I assumed it would come crashing down in the middle of the first night sending me flying out of bed like this fellow. Instead it has been on for better than a week even with Wesley’s help picking up the toys.
Once you have the your mounting bracket in place, you just slide the frog’s body on. Nothing but gravity holds them together, but it seems to work pretty well. The body has never fallen down. The frog’s head is away from the wall making a hidden shelf you could use for shampoo or cups or whatever. Very nice. The toes also stick away from the wall. We use it to hang wet wash clothes so they get dry and not smelly. Also very nice. See what I mean? This thing is very well designed.
Finally you have the basket. It doesn’t seem that large, but actually holds all of the standard toys Wesley plays with. If he had any more toys in the tub we wouldn’t need water it would just be a ball pit like they have at Chuck E. Cheese. The basket has some nice large holes in it to quickly drain the water out and a good sturdy handle. You can actually scoop up most of the toys in one go by herding them around the tub a little. The only problem that I’ve encountered is that the basket is a little difficult to slide onto the body. If the scoop is full it usually takes me an extra try or two, but it always go.
We bought the Frog Pod for about $25. Worth every penny.
Boon, Inc: http://www.booninc.com/frog.html
Amazon.com: Boon Frog Pod
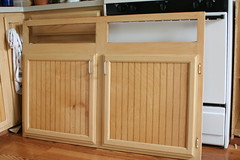
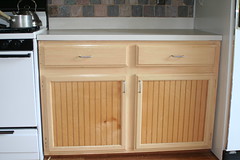
Last Thursday I get a call from Amber at work. Almost immediately I can tell something is up. She has that “I want to tell you something you aren’t going to like so I’m going to feel you out for a while, beating around the bush, until I figure out just how mad you’ll be” tone in her voice. I immediately recognized it and asked her to cut to the chase. In my head I figured the computer monitor had been stepped on, one of Wesley’s toys thrown through the window or some sort of damage to the tv, walls or roof had occurred. Instead Amber told me the cabinet in the kitchen had come completely apart. We have been experiencing problems with this cabinet since we first moved in. Basically the whole front has been threatening to fall off. Well, now it had fallen off. See the picture if you are wondering what I’m talking about. I guess Wesley had leaned against an open cabinet door and ripped it clear off. Now we had been thinking of replacing the cabinets, but not quite yet. These cabinets are old and frankly were cheaply built to begin with. The fronts are the only part made of solid wood and I swear the rest is made of pressed newspaper and glue. (The pipe in the photo is the gas shutoff valve.)
So I hatched a plan to fix the cabinet properly. Basically it involved removing the front (already done by Wesley), removing the countertop, and pulling it from the wall. Once free I would be able to flip it over, properly reattach, reglue, replace as needed. I would also have access to the underside of the cabinet which is where some of the connections needed to be made. I would be able to cinch pieces together with clamps for drying and it would be as good or better than new. To that end I headed to Home Depot and bought some wood glue, a few pieces of 2″x2″x8′ lumber and some 2″ screws. The lumber at home depot is miserable (at least the stuff I was looking at) and despite spending 20 minutes digging I couldn’t find any pieces that were actually true. They all had bends and twists. I grabbed the best two I could find hoping that they would work once cut down to size.
The knowledgeable woodworker, professional cabinet maker, or just those with strong feelings about doing things “properly” should stop reading now.
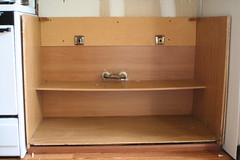
I easily removed the counter top, but it became obvious after a few minutes that we had a small problem. I removed all the screws mounting the cabinet to the wall, but still the thing would not budge. It seems to have fused in place over the past twenty plus years. The frame of the cabinet is all press board and I was afraid to tug on it very hard. If we were replacing them I would have gotten out the crowbar and taken care of business, but since we needed all the pieces in basically the same shape they are now we had to change plans. New plan: reattach front without moving the cabinet, provide additional support and reinforcement and not let any of the changes be apparent from the outside!
Originally the cabinet front had been held on with glue down the sides, staples at the bottom which also connected to the floor of the cabinet and some small triangular corner brackets that also kept the top on. Without being able to flip it over I couldn’t glue it properly as I wasn’t able to put proper pressure on it while it dried and I also couldn’t put the staples in because they had to come from the bottom or they would be visible when you opened the doors. The little corner pieces alone wouldn’t do the trick because they just aren’t strong enough and don’t cover enough of the cabinet to provide the kind of support I’m going to need.
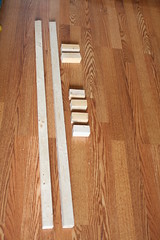
Tick, Tick, Tick (that is my brain thinking). What I need is cross bracing that runs all the way across. It can go over and under the top drawers and will both mount the sides on and front in place. A few quick measurements, a few slower ones to be sure I did it right he first time and we were off. I grab the jigsaw Dave gave me and head outside with the bendy wood and my partner in crime, Wesley. We both don our safety goggles. I put Wesley in the yard, close the deck gate and start cutting. A few minutes later I have turned two long pieces of wood into the many small pieces you see here.
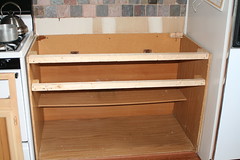
I mounted the smallest pieces to the outside edges of the cabinet. And then screwed my cross braces into those creating a great deal more support than I had before. Almost immediately the cabinet was rigid and didn’t wobble like it had before. It looks ugly, but who cares, nobody is going to see this part anyway. I added a medium piece to the back rear corner because that bracket was shot and got ready to mount the front back on.
I decided that more screws was better than fewer and so the front of the cabinet would be held on by four screws on the top brace and four on the bottom. No problem there. The front when on easily and felt strong and tight. It didn’t threaten to move even at the bottom where it isn’t really hooked on to anything. I thought I might need to add a brace near the bottom, but I don’t think there is any real need. On goes the countertop, in go the screws, and on go the tracks for the drawers. It looks good, you can’t see the bracing and it is so much better than before. In go the drawers…well, almost. They don’t fit. They are hitting on the top cross brace. Why? Didn’t I measure? Well, yeah, I did. Do you remember the wood from home depot? The wood is so warped that it is now blocking the drawers.
Off comes the countertop, out come all the screws. At this point I admit to a few choice swearwords passing my lips. Fortunately for me, the solution was pretty easy. The cabinet top is recessed underneath just a bit. I was able to move the top brace up just shy of a half inch. I mounted everything back together. This time with much less enthusiasm and self assuredness I tried the drawers. They fit! The countertop is solid, the doors open and close, everything is nice and secure and perfectly level. This should do until we replace them all.
Total Cost:
Wood: $3.00
Wood glue (not used): $4.00
Box of screws: $6.00
Total: $13, plus I used some of the remaining screws to secure a few loose boards in the deck. The glue I’ll keep for the next project.
Tags: cabinet, home repair