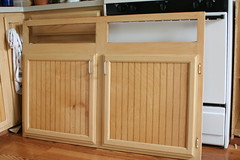
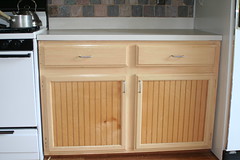
Last Thursday I get a call from Amber at work. Almost immediately I can tell something is up. She has that “I want to tell you something you aren’t going to like so I’m going to feel you out for a while, beating around the bush, until I figure out just how mad you’ll be” tone in her voice. I immediately recognized it and asked her to cut to the chase. In my head I figured the computer monitor had been stepped on, one of Wesley’s toys thrown through the window or some sort of damage to the tv, walls or roof had occurred. Instead Amber told me the cabinet in the kitchen had come completely apart. We have been experiencing problems with this cabinet since we first moved in. Basically the whole front has been threatening to fall off. Well, now it had fallen off. See the picture if you are wondering what I’m talking about. I guess Wesley had leaned against an open cabinet door and ripped it clear off. Now we had been thinking of replacing the cabinets, but not quite yet. These cabinets are old and frankly were cheaply built to begin with. The fronts are the only part made of solid wood and I swear the rest is made of pressed newspaper and glue. (The pipe in the photo is the gas shutoff valve.)
So I hatched a plan to fix the cabinet properly. Basically it involved removing the front (already done by Wesley), removing the countertop, and pulling it from the wall. Once free I would be able to flip it over, properly reattach, reglue, replace as needed. I would also have access to the underside of the cabinet which is where some of the connections needed to be made. I would be able to cinch pieces together with clamps for drying and it would be as good or better than new. To that end I headed to Home Depot and bought some wood glue, a few pieces of 2″x2″x8′ lumber and some 2″ screws. The lumber at home depot is miserable (at least the stuff I was looking at) and despite spending 20 minutes digging I couldn’t find any pieces that were actually true. They all had bends and twists. I grabbed the best two I could find hoping that they would work once cut down to size.
The knowledgeable woodworker, professional cabinet maker, or just those with strong feelings about doing things “properly” should stop reading now.
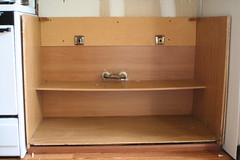
I easily removed the counter top, but it became obvious after a few minutes that we had a small problem. I removed all the screws mounting the cabinet to the wall, but still the thing would not budge. It seems to have fused in place over the past twenty plus years. The frame of the cabinet is all press board and I was afraid to tug on it very hard. If we were replacing them I would have gotten out the crowbar and taken care of business, but since we needed all the pieces in basically the same shape they are now we had to change plans. New plan: reattach front without moving the cabinet, provide additional support and reinforcement and not let any of the changes be apparent from the outside!
Originally the cabinet front had been held on with glue down the sides, staples at the bottom which also connected to the floor of the cabinet and some small triangular corner brackets that also kept the top on. Without being able to flip it over I couldn’t glue it properly as I wasn’t able to put proper pressure on it while it dried and I also couldn’t put the staples in because they had to come from the bottom or they would be visible when you opened the doors. The little corner pieces alone wouldn’t do the trick because they just aren’t strong enough and don’t cover enough of the cabinet to provide the kind of support I’m going to need.
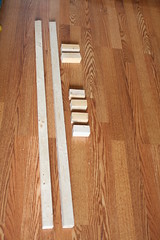
Tick, Tick, Tick (that is my brain thinking). What I need is cross bracing that runs all the way across. It can go over and under the top drawers and will both mount the sides on and front in place. A few quick measurements, a few slower ones to be sure I did it right he first time and we were off. I grab the jigsaw Dave gave me and head outside with the bendy wood and my partner in crime, Wesley. We both don our safety goggles. I put Wesley in the yard, close the deck gate and start cutting. A few minutes later I have turned two long pieces of wood into the many small pieces you see here.
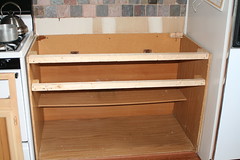
I mounted the smallest pieces to the outside edges of the cabinet. And then screwed my cross braces into those creating a great deal more support than I had before. Almost immediately the cabinet was rigid and didn’t wobble like it had before. It looks ugly, but who cares, nobody is going to see this part anyway. I added a medium piece to the back rear corner because that bracket was shot and got ready to mount the front back on.
I decided that more screws was better than fewer and so the front of the cabinet would be held on by four screws on the top brace and four on the bottom. No problem there. The front when on easily and felt strong and tight. It didn’t threaten to move even at the bottom where it isn’t really hooked on to anything. I thought I might need to add a brace near the bottom, but I don’t think there is any real need. On goes the countertop, in go the screws, and on go the tracks for the drawers. It looks good, you can’t see the bracing and it is so much better than before. In go the drawers…well, almost. They don’t fit. They are hitting on the top cross brace. Why? Didn’t I measure? Well, yeah, I did. Do you remember the wood from home depot? The wood is so warped that it is now blocking the drawers.
Off comes the countertop, out come all the screws. At this point I admit to a few choice swearwords passing my lips. Fortunately for me, the solution was pretty easy. The cabinet top is recessed underneath just a bit. I was able to move the top brace up just shy of a half inch. I mounted everything back together. This time with much less enthusiasm and self assuredness I tried the drawers. They fit! The countertop is solid, the doors open and close, everything is nice and secure and perfectly level. This should do until we replace them all.
Total Cost:
Wood: $3.00
Wood glue (not used): $4.00
Box of screws: $6.00
Total: $13, plus I used some of the remaining screws to secure a few loose boards in the deck. The glue I’ll keep for the next project.

Tags: cabinet, home repair